

Direct answer: To replace a damaged soffit panel, first check its material — vinyl and aluminum panels open with a zip tool and slide free of the J-channel, while wood panels are nailed and/or glued and must be pried loose. Match the new panel’s profile and color before installing it.
Key takeaways:
- Soffit material (vinyl, aluminum, or wood) decides whether you open-and-slide the old panel out or pry it loose.
- Vinyl and aluminum soffit panels interlock and run through a J-channel track — there are no face screws along the panel itself to remove.
- Wood soffit is nailed and/or glued in place, so removal takes more force and the old piece usually can’t be reused.
- Buy a replacement panel that matches the existing profile (solid vs. vented/perforated) and color before you start.
- Standard ladder-safety rules apply at the eave; call a licensed contractor for anything above a single story or where the rot has reached the framing.
What Tools Do You Need to Replace a Soffit Panel?
For vinyl or aluminum soffit, you need a zip tool (sometimes called a notch tool) to release the interlocking seam, a flat pry bar for stubborn sections, work gloves, and safety glasses. For wood soffit, add a cat’s paw or flat bar for pulling nails, a utility knife to score any caulk or paint film sealing the edges, and a reciprocating saw if a section has to be cut free rather than pried whole. Keep a tape measure and the old panel on hand so you can match width and profile when you buy the replacement.
How Do You Remove a Damaged Vinyl or Aluminum Soffit Panel?
Vinyl and aluminum soffit panels are not face-fastened along their length. They interlock at the seams and slide through a J-channel (or F-channel) track fastened to the fascia and the wall. Removal is a matter of releasing that interlock, not pulling fasteners out of the panel itself. The two materials differ slightly in how the interlock releases, based on manufacturer installation guidance for each.
| Step | Vinyl (snap-out) | Aluminum (snap-out) |
|---|---|---|
| 1 | Slide a zip tool between the interlocking panel edges to release the lock. | Remove the fasteners holding the fascia-side trim over the panel edge. |
| 2 | Slide the released panel out of the J-channel / retaining track. | Flex the panel gently to disengage the interlocking groove. |
| 3 | Slide the new panel’s edge into the channel and snap the lock closed. | Slide the panel out of the J-channel track. |
| 4 | — | Once all panels are out, the wall-side J/F-channel track is also accessible if it needs replacing. |
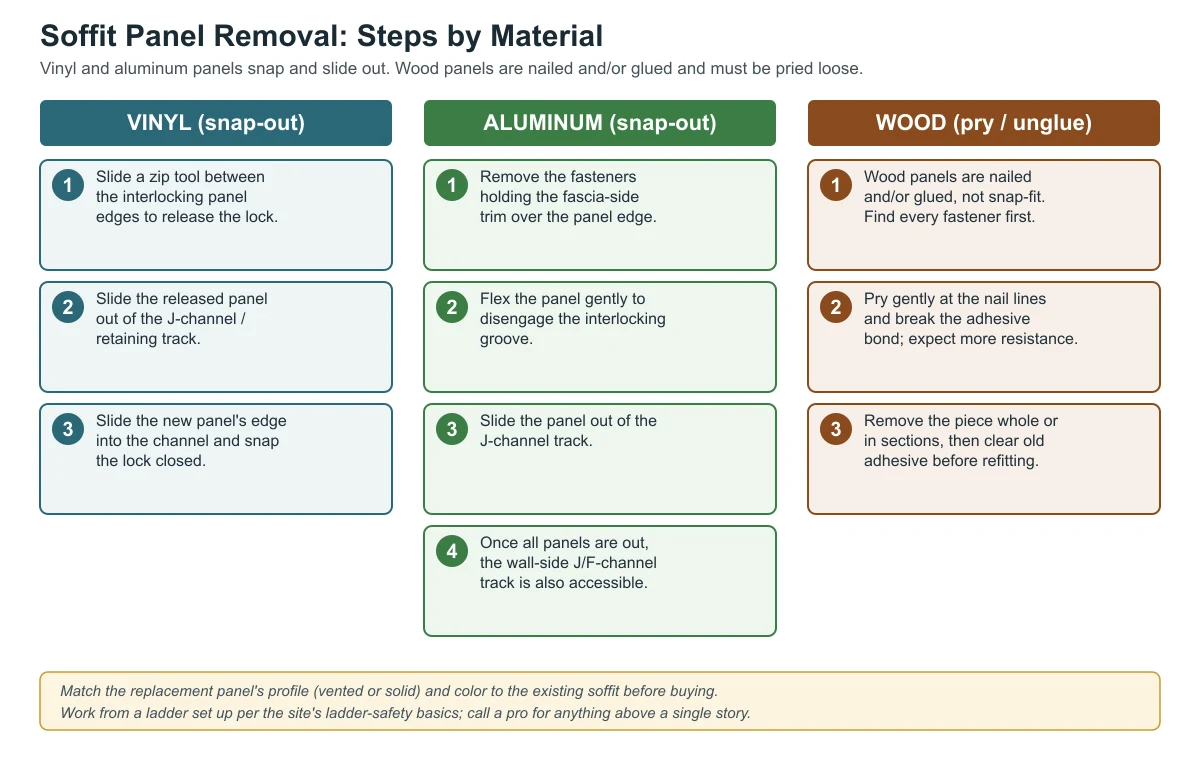
Work one panel at a time, starting from whichever end of the run has the most clearance — often where the soffit meets a corner post or a vent. Once the damaged panel is free, check the J-channel itself for cracks or rust before reinstalling; a damaged channel won’t hold the new panel securely even if the panel itself is fine.
How Do You Remove a Damaged Wood Soffit Panel?
Wood soffit is a different job. It’s typically nailed and, in many installations, also glued, so it doesn’t release with a zip tool the way vinyl and aluminum do. Start by locating every visible nail head and backing it out partway with a cat’s paw before prying. If the board was glued along the edges, run a utility knife through the seam first to break the adhesive bond — trying to pry a glued board loose without cutting the seam tends to crack the board next to it as well, turning a one-panel repair into a two-panel repair.
Expect more resistance than with vinyl or aluminum, and expect the removed piece to come out in sections rather than as one clean piece, especially if the wood is already partly deteriorated. That’s normal and doesn’t mean you’re doing it wrong.

How Do You Choose a Matching Replacement Panel?
A soffit panel that doesn’t match the rest of the run is one of the most common giveaways of a patch job. Before you buy anything, work through this checklist:
- Solid or vented? Confirm whether the existing panel is solid or vented/perforated. Swapping a solid panel into a vented run cuts off attic airflow at that spot — which matters for the ventilation math covered in how many soffit vents you need.
- Width and channel depth. Measure the panel’s face width and also how deep it needs to seat into the J-channel, not just the visible dimension — a panel that’s the right width but too shallow won’t lock in securely.
- Color and finish. Match both the color and the surface finish (woodgrain-textured vs. smooth) to the surrounding panels. Staying with the same product line from the same manufacturer is the most reliable way to get a true match.
- Discontinued profiles. If the existing soffit is old enough that its exact profile is no longer sold, consider replacing the whole visible run instead of one piece — a close-but-not-exact match is often more noticeable than a clean, uniform new section.
How Do You Install the New Panel?
Installation reverses the removal steps: slide the new panel into the J-channel, engage the interlock, and refasten anything you removed to access it (the fascia-side trim on aluminum, for example). If you’re also replacing a section of J-channel, fasten it with the channel’s screws or nails spaced roughly every 12 to 16 inches, and leave them slightly loose rather than driven tight — vinyl and aluminum trim both expand and contract with temperature, and an installation that’s fastened too tightly can buckle or rattle as it moves. For wood soffit, nail into solid backing the same way the original panel was fastened, and prime or paint all sides of a new wood panel before installing it, since unfinished wood left exposed at the edges is where the next round of rot usually starts.
When Should You Call a Professional Instead of Patching It Yourself?
A single damaged panel on a single-story eave, with a ladder set up correctly, is a reasonable DIY repair for most homeowners. Call a licensed contractor instead when any of these apply:
- The job requires access above a single story, or the eave can’t be reached safely from a properly set-up extension ladder.
- Rot has spread past the soffit into the fascia board or the rafter tails behind it — that’s a structural repair, not a panel swap.
- There’s electrical wiring for soffit lighting in or near the damaged section.
- More than a few panels in a row are damaged, which usually points to a moisture or ventilation problem worth diagnosing first — see our guide to signs of soffit and fascia damage — rather than one that a single panel swap will fix.
Whenever the work does involve a ladder: set the base out 1 ft for every 4 ft of ladder height (roughly a 75.5° angle), extend the ladder at least 3 ft above the roofline or landing surface for a handhold, maintain three points of contact, don’t stand on the top three rungs, and have a spotter hold the base. Skip a metal ladder near power lines, and use non-slip footwear on solid, level ground.
Frequently Asked Questions
Can you replace just one soffit panel, or do you need to redo the whole run?
Usually just the damaged one. Vinyl, aluminum, and wood soffit panels are all designed to be installed and removed individually within a J-channel or nailed-in run, so a single bad panel doesn’t require tearing out the whole soffit — as long as you can find or closely match the replacement profile and color.
Do vinyl and aluminum soffit panels use the same J-channel?
They use the same type of track system (a J-channel or F-channel that the panel edge slides into), but the channel itself is usually sold to match the material — vinyl track for vinyl panels, aluminum track for aluminum panels. Mixing materials in the same channel isn’t a standard installation and can affect how securely the panel locks in.
What is soffit J-channel, and do you need to replace it too?
J-channel is the U-shaped or J-shaped track fastened to the fascia and the house wall that the soffit panel’s edges slide into and lock against. You only need to replace it if it’s cracked, rusted, or bent — check it while the old panel is out, since it’s much easier to access at that point than after the new panel is installed.
Is replacing a damaged soffit panel a DIY job?
For a single-story eave and a single damaged panel, yes, for most homeowners comfortable on a ladder. It becomes a job for a licensed contractor once the access goes above one story, the rot has spread into the fascia or rafter tails, or there’s wiring involved in the repair area.
Sources
- Installing Vinyl Siding and Aluminum Trim, Habitat for Humanity Detroit (installation guide)
- How to Remove Soffit Panels, Hooked on Homes
- How to Remove Aluminum Soffit, The Metalix
For the fuller picture of how soffit relates to fascia and where problems usually start, see our pillar guide: soffit vs. fascia, what they are and how to fix problems. If you’re choosing a replacement material rather than matching what’s already installed, our vinyl vs. wood vs. aluminum soffit comparison breaks down the trade-offs. And if the fascia board itself needs a patch rather than the soffit panel above it, see how to replace a short section of fascia board.
soffitfasciafix.com Editorial Team. Last updated: November 13, 2026.


[…] gutter in place depends on the gutter being braced, the board being cut out in sections, and the replacement matching the old thickness and opening. The work is slower than a full gutter removal, and it is not the […]